Configuring Auto-Monitoring for Git Repositories
If your organization uses GitHub or GitLab as your code host, LinearB's Auto-Monitoring feature allows you to automatically track new repositories as they are created.

Repository Auto-Monitoring automatically tracks newly created or discovered repositories connected to your Git provider, ensuring they are added to LinearB without manual setup. This helps keep metrics complete as your organization grows.
LinearB supports auto-monitoring for GitHub, GitLab, Bitbucket Cloud, and Azure DevOps (ADO), across private, public, and internal repositories.
For initial Git setup, see Connecting Your GitHub Account to LinearB .

Supported Auto-Monitoring Scenarios
Repository auto-monitoring is supported for the following Git providers and deployment models:
| Git Provider | Deployment Type | Auto-Monitoring Supported |
|---|---|---|
| GitHub | Cloud | ✅ Yes |
| GitLab | Cloud / Self-Managed | ✅ Yes |
| Bitbucket | Cloud | ✅ Yes |
| Bitbucket | Server (non-OPA) | ❌ No |
| Azure DevOps | Cloud | ✅ Yes |
Summary
- Automatically include new repositories as they are created or discovered.
- Use regex-based rules to control inclusion and exclusion.
- Supports private, public, and internal repositories.
- Requires sufficient Git token permissions to detect repositories.
Before you begin
- You must be a Company Admin in LinearB.
- Your Git integration token must have access to the repositories you want to monitor.
- Auto-Monitoring for Bitbucket Cloud and ADO requires feature flags.
- If auto-monitoring is not supported for your provider or deployment type (for example, Bitbucket Server (non-OPA)), the Monitoring Rules option will not appear in the UI.
Configure repository auto-monitoring
-
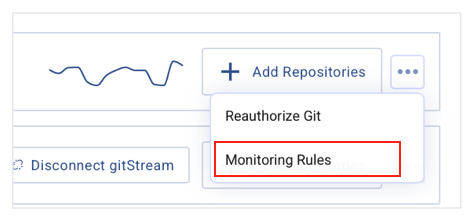
Access Monitoring Rules
- Go to Settings → Company Settings.
- Open the Git tab.
- Click the three-dot menu next to Add Repositories.
- Select Monitoring Rules.
UI Availability: If you do not see Monitoring Rules, auto-monitoring may not be supported for your Git provider or deployment type (for example, Bitbucket Server (non-OPA)).
-
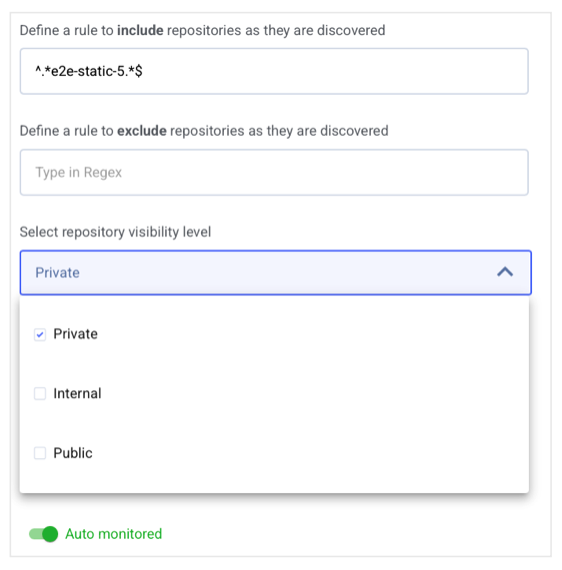
Define monitoring rules
-
Enter a regex pattern to include repositories.
- To include all repositories, use
.*.
- To include all repositories, use
- Optionally add exclusion rules (for example, documentation repositories).
-
Enter a regex pattern to include repositories.
-
Verify token access
- Ensure your Git token can access the repositories being monitored. Repositories without permission will not be detected.
-
Select repository visibility
Choose which repository types to monitor: private, internal, and/or public.
-
Configure organizational scope (GitHub only)
Define which organizations are included using regex or manual selection.
-
Define inclusion and exclusion rules
- Include repositories using a regex in the Include field.
- Exclude repositories using a regex in the Exclude field.
-
Example:
^test*excludes repositories starting with test.
-
Select organizations
-
Use regex (for example,
.*for all orgs,^linear-for orgs starting with “linear-”). - Or manually select organizations from the list.
-
Use regex (for example,
-
Enable Auto-Monitoring
Ensure the Auto monitored toggle is enabled.
- Click Save to apply your configuration.

Important notes
- UI availability: If auto-monitoring is not supported for your Git provider or deployment type, the Monitoring Rules option will not appear in the integration menu. This behavior is expected and does not indicate a misconfiguration.
- New repository sync: Allow up to 24 hours for newly added repositories to appear.
- New organizations: GitHub organizations added later must be manually selected in monitoring rules.
- Regex precision: Carefully define exclusion rules to avoid monitoring unintended repositories.

Next steps
After enabling repository auto-monitoring, connect your project management tool to complete your setup: Connect LinearB to your PM tool .
Auto-monitoring reduces manual overhead, keeps metrics accurate, and ensures new repositories are tracked as your organization evolves.
How did we do?
Git Activity: Metrics & Filters Glossary
Configuring Release Detection in LinearB