Configuring SCIM in Okta for LinearB
Configure SCIM in Okta for LinearB

Overview
This article explains how to configure SCIM (System for Cross-domain Identity Management) in Okta for LinearB. It covers SCIM connection setup, user attribute mapping, role and team-scope provisioning, and Developer Coaching access. It also explains how to enforce the correct username mapping to avoid inconsistent user provisioning.
Requirements
LinearB supports SCIM V2.0 and adheres to the User Core Schema for user creation and updates.
- SCIM version: V2.0
- Supported schema:
urn:ietf:params:scim:schemas:core:2.0:User
Prerequisites
SCIM-based user provisioning is available to Enterprise customers. Ensure you have:
- An admin account in Okta.
- Access to LinearB Company Settings.
- A SCIM API token from LinearB.
Key Features
- Auto-provisioning: Users assigned to the LinearB application in Okta are automatically created in LinearB.
- User attribute updates: Changes in Okta sync automatically to LinearB.
- User deactivation: Deactivated users in Okta are automatically removed from LinearB.

Step 1: Enable SCIM in LinearB
- In LinearB, go to Company Settings > Settings, and open the API Tokens tab.
- Click Create API Token, enter a label, and click Create.
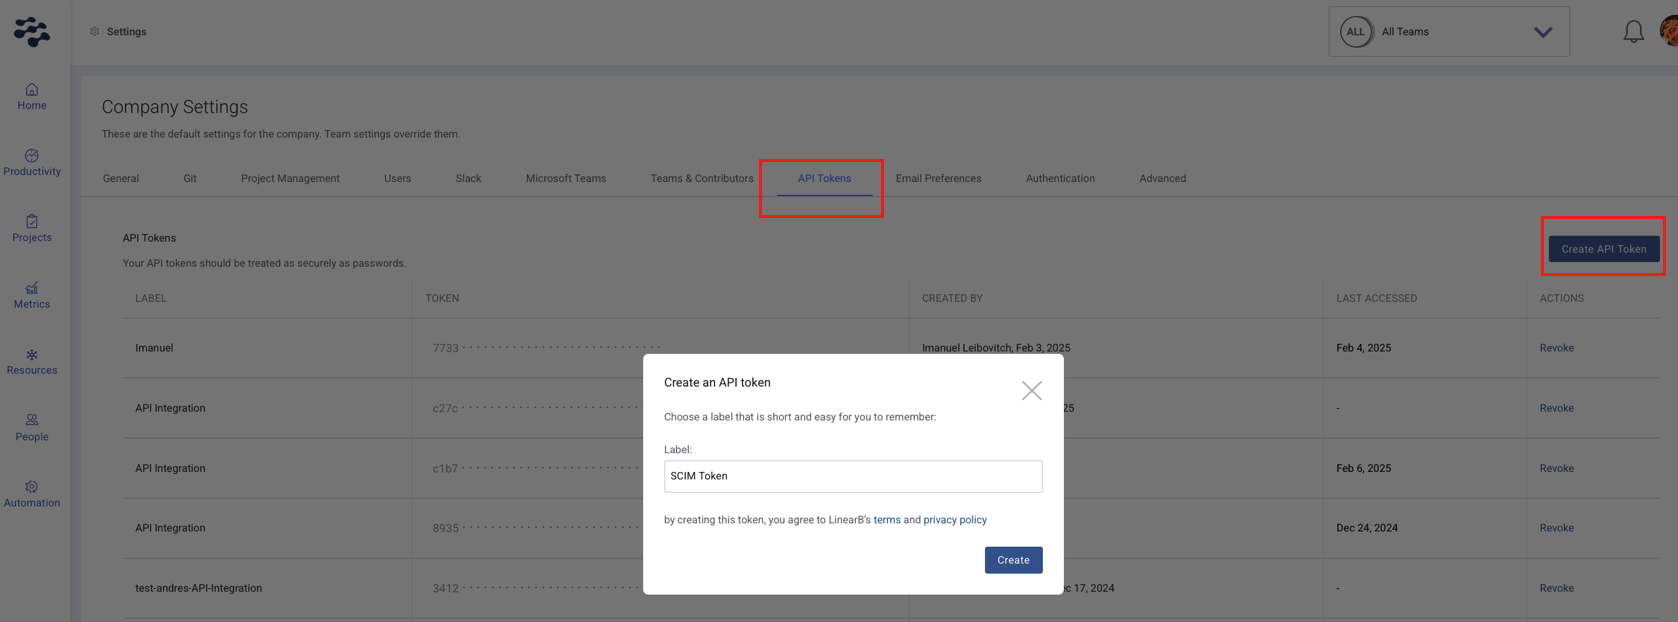
- Copy your new token immediately, as you will not be able to view it again later.
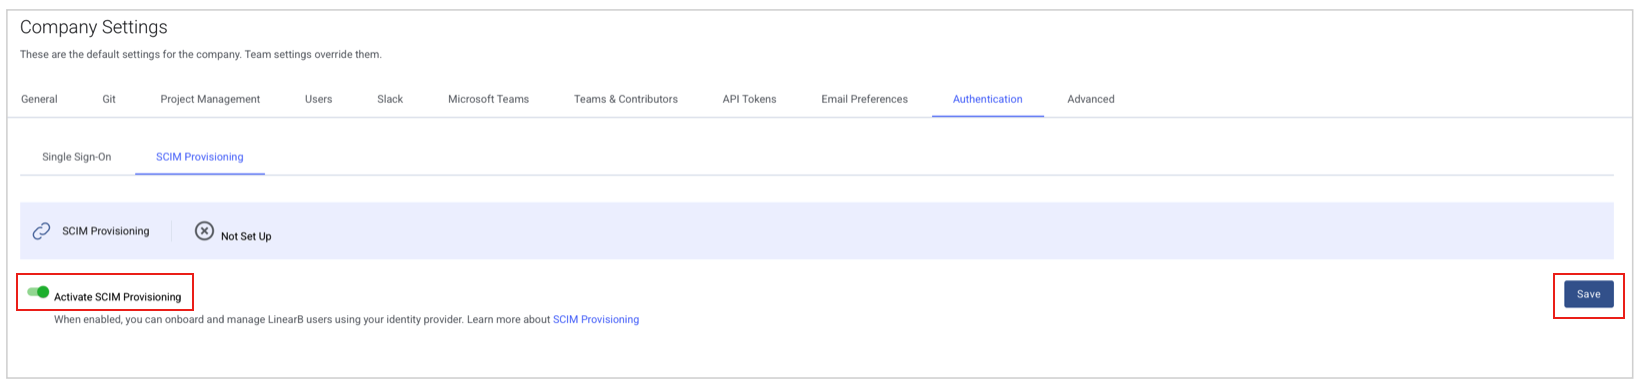
- Navigate to Authentication > SCIM Provisioning.
- If you do not see the Authentication tab, please reach out to your Customer Success Manager.
- Enable SCIM and click Save.

Step 2: Configure SCIM in Okta
2.1 Enable SCIM Provisioning
- In Okta, open the LinearB application.
- Go to General Settings.
- Enable SCIM Provisioning and save your changes.
2.2 Set Up the SCIM Connection
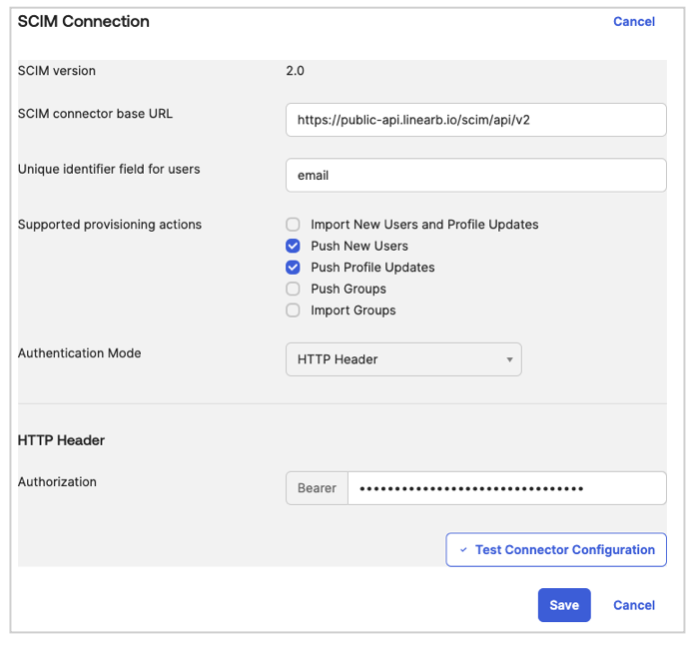
- Go to the Provisioning tab in the LinearB Okta app.
- Click Edit and enter the following details:
- SCIM Connector Base URL:
https://public-api.linearb.io/scim/api/v2 - Unique Identifier Field for Users:
email - Supported Provisioning Actions:
- Push New Users
- Push Profile Updates
- Push Groups
- Authentication Mode: HTTP Header
- HTTP Header: Enter the LinearB API Token from Step 1
- SCIM Connector Base URL:
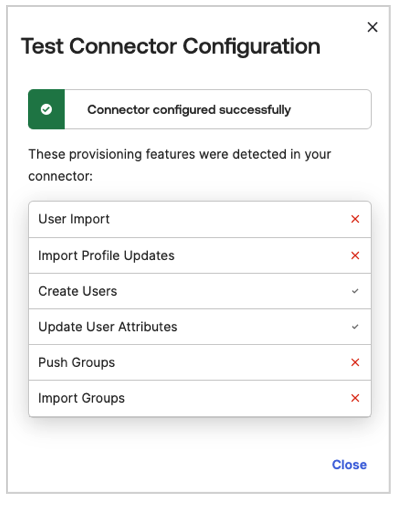
- Click Save, then run Test Connector Configuration to validate the connection.
2.3 Enable Provisioning Actions
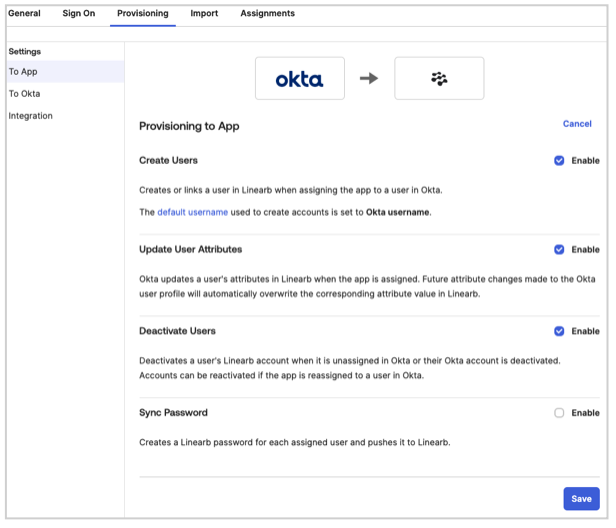
To ensure proper provisioning, enable the following actions in Okta:
- In Provisioning to App, enable:
- Create Users
- Update User Attributes
- Deactivate Users
- Click Save to confirm the settings.

Step 3: Configure User Attributes in Okta
3.1 Map User Attributes
- Go to Directory > Profile Editor > select LinearB App > click Add Attribute.
- Configure the following attributes:
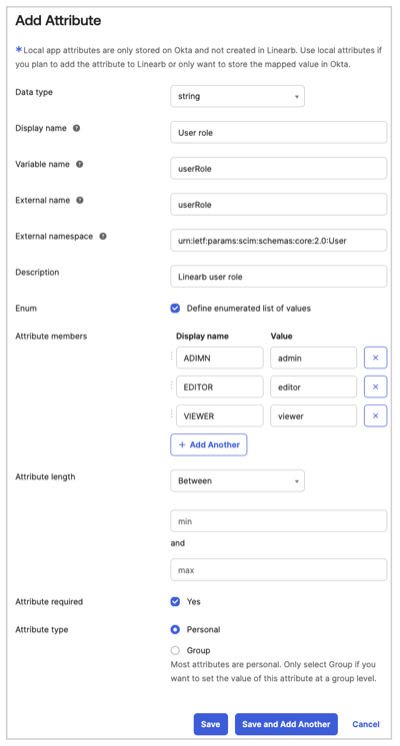
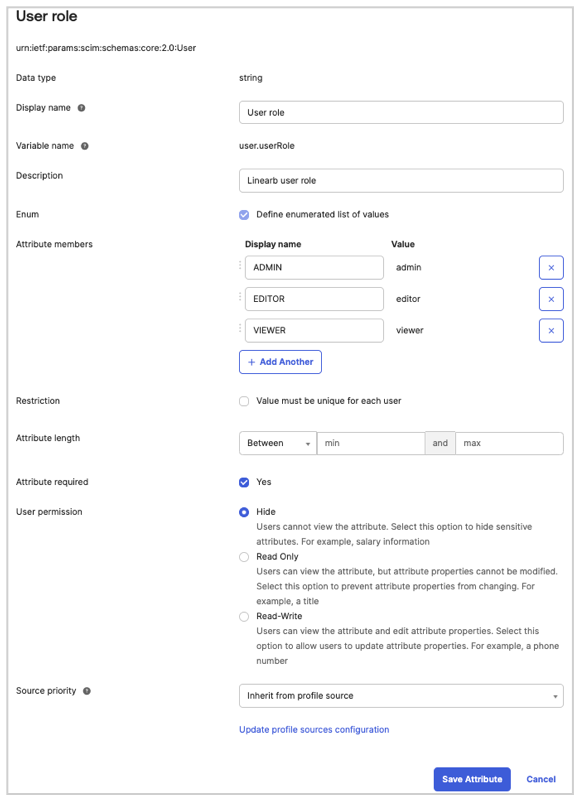
- User Role
- Data Type: String
- Display Name:
User role - Variable Name:
userRole - External Name:
userRole - External Namespace:
urn:ietf:params:scim:schemas:core:2.0:User - Description: LinearB user role
- Enum Values:
- ADMIN →
admin - EDITOR →
editor - VIEWER →
viewer
- ADMIN →
- Attribute required: Yes
- Attribute Type:
- Select Personal if SCIM provisioning runs when attaching a single user to the Okta LinearB app.
- Select Group if SCIM provisioning runs when attaching a group to the Okta LinearB app.
- Click Save and Add Another.
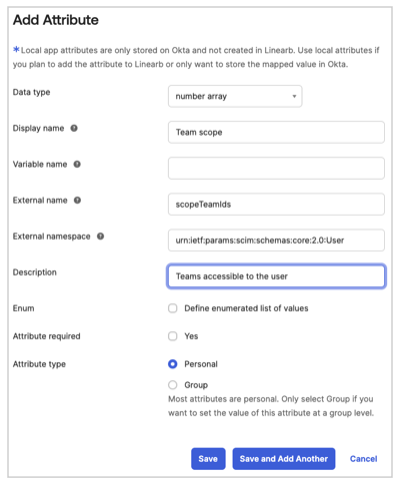
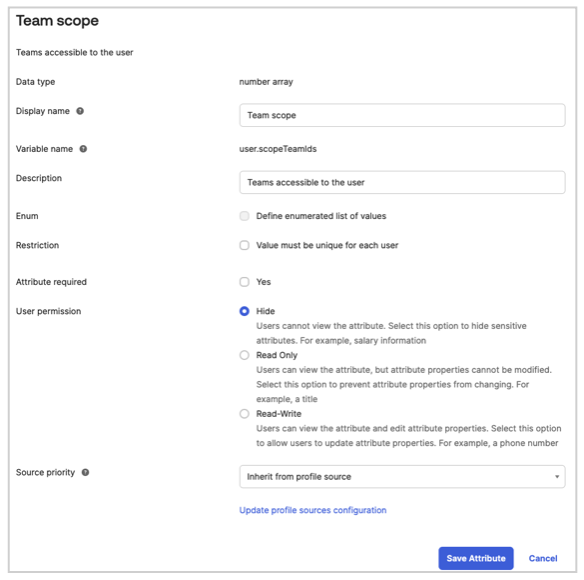
- Scope Team IDs
- Data Type: Number array
- Display Name:
Team scope - Variable Name:
scopeTeamIds - External Name:
scopeTeamIds - External Namespace:
urn:ietf:params:scim:schemas:core:2.0:User - Description: Teams accessible to the user
- Attribute required: No
- Attribute Type:
- Select Personal if SCIM provisioning runs when attaching a single user to the Okta LinearB app.
- Select Group if SCIM provisioning runs when attaching a group to the Okta LinearB app.
- Click Save and Add Another.
- Developer Coaching Access
- Data Type: Boolean
- Display Name:
viewDevCoaching - Variable Name:
viewDevCoaching - External Name:
viewDevCoaching - External Namespace:
urn:ietf:params:scim:schemas:core:2.0:User - Description: Access developer coaching
- Attribute required: No
- Attribute Type: Personal
- Mutability:
READ_WRITE
- Click Save.
The
scopeTeamIds attribute controls team scope, but it does not grant access to the Developer Coaching module by itself. To enable Developer Coaching through SCIM, you must also configure the viewDevCoaching attribute.
The following example shows how the viewDevCoaching attribute is configured in Okta.
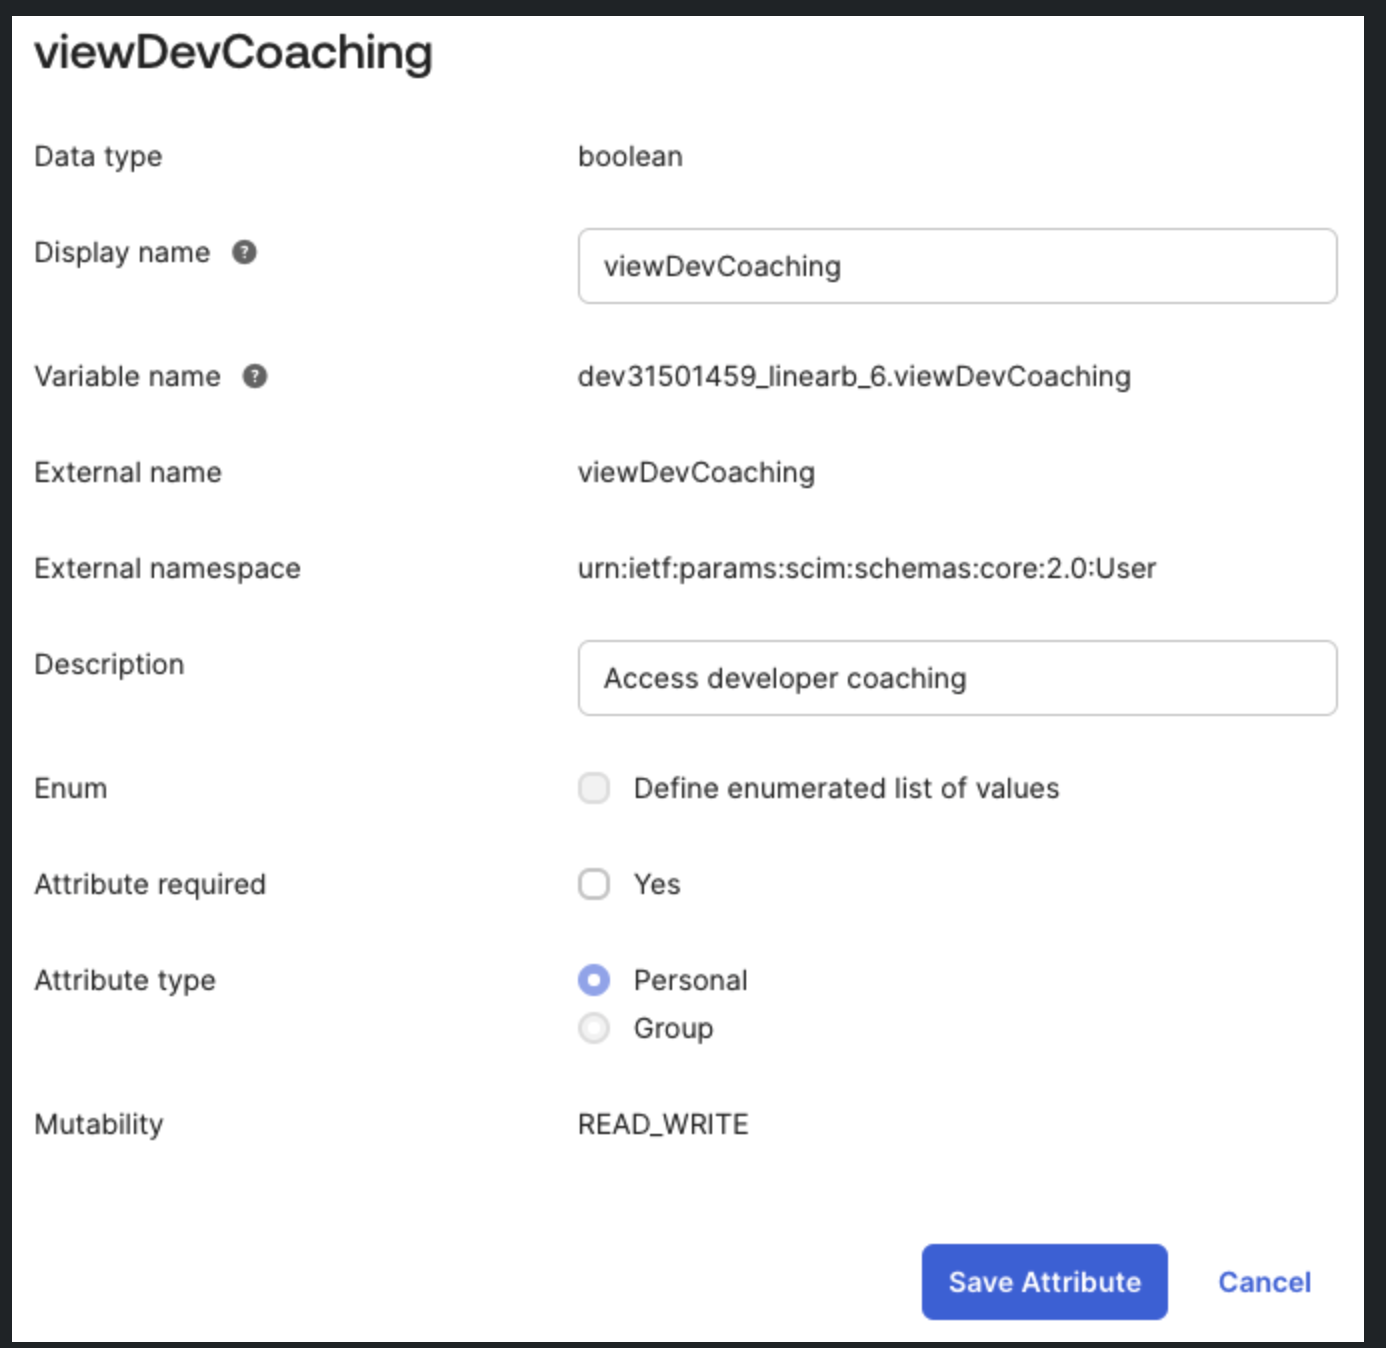
viewDevCoaching SCIM attribute in Okta.3.2 Configure Okta User Custom Fields
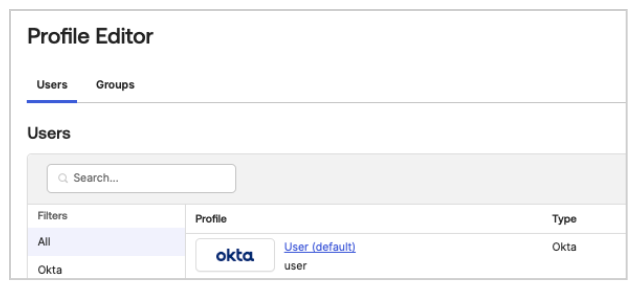
To ensure SCIM provisioning functions correctly, custom attributes must also be configured for Okta users.
- Go to Directory > Profile Editor > select Okta User.
- Click Add Attribute and configure the following fields:
- User Role (see Step 3.1 for details on values and mappings)
- Scope Team IDs (see Step 3.1 for details on values and mappings)
- Developer Coaching Access (see Step 3.1 for details on values and mappings)
3.3 Map Attributes to User Profile
Mapping User Role
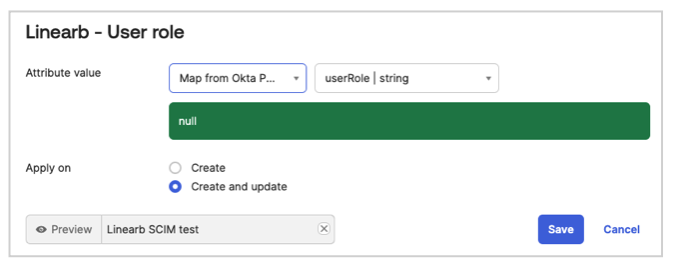
This configuration ensures that the correct user role is mapped in Okta and synchronized with LinearB.
Mapping Team Scope
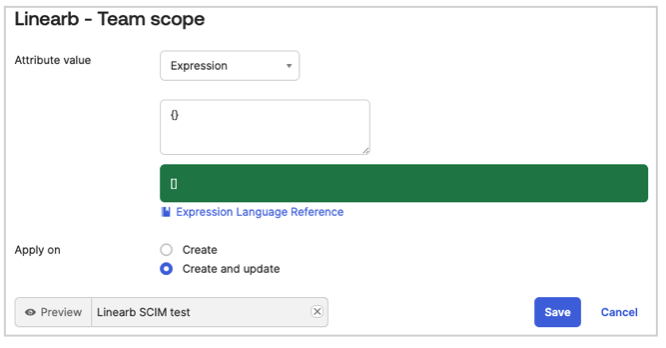
Ensure that the default value {} is properly set to avoid mapping errors.
Mapping Developer Coaching Access
Map the viewDevCoaching attribute so that Developer Coaching visibility is sent during SCIM provisioning.
We now need to ensure that the attributes leveraged by the SCIM integration are sent.
- In Okta, navigate to Applications > LinearB > General > Edit SAML settings.
- Create the following mappings under Attribute Statements:
- Name:
userName- Value:
${user.login}
- Value:
- Name:
userRole- Value:
${user.userType}
- Value:
- Name:
scopeTeamIds- Value:
${user.teamIds}
- Value:
- Name:
viewDevCoaching- Value:
${user.viewDevCoaching}
- Value:
- Name:
- Click Save to apply the mappings.
- Go to Applications > LinearB App > Provisioning > To App.
- Scroll down and click the Pencil Icon to map attributes.
- Map User Role, Team Scope, and Developer Coaching Access. Set
{}as the default value for Team Scope. - Click Save.

Step 4: Assign Users
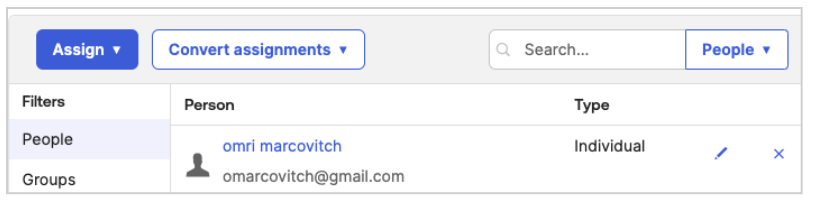
- In Okta, go to LinearB Application > Assignments.
- Click Assign > Assign to People.
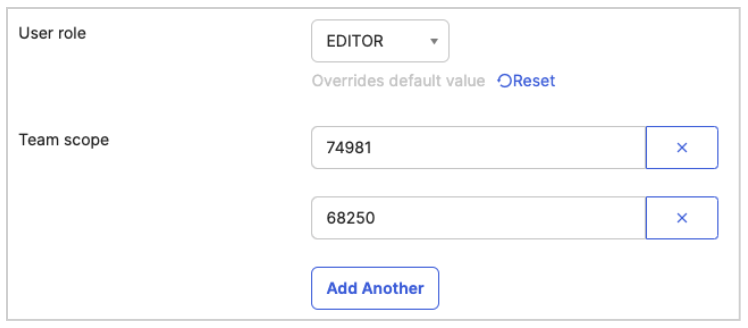
- Select a user and configure the appropriate values.
Set User Role, Team Scope, and Developer Coaching Access as needed.
- Example: Team ID 74981, Group Name SCIM Tutorial, and ID 68250, Team Name Beatles.
- To retrieve internal LinearB team IDs, use the public API or the LinearB platform.
- Click Save and Go Back > Done.

Step 5: Validate SCIM Setup
Proper validation ensures that SCIM is working correctly.
In Okta
- Navigate to LinearB Application > Assignments.
- Confirm that the assigned user has the correct User Role, Team Scope, and Developer Coaching Access value.
- Verify that SCIM provisioning actions (Push New Users, Profile Updates, and so on) are functioning as expected.
In LinearB

- Check that the user appears in Company Settings > Users.
- Verify that the User Role and Team Assignments are correct.
- Verify that the Developer Coaching module visibility matches the configured
viewDevCoachingvalue.
- Perform a manual resync if necessary by reassigning the user in Okta.

Naming Convention and Issue Resolution
Issue: Incorrect Naming Format in LinearB
Problem: Some users appear with an incorrect username (for example, I67584@company.com instead of johndoe@company.com).
Solution: Enforce Proper User Mapping
To configure userName mapping:
- Go to the LinearB application in Okta.
- Click General > SAML Settings > Edit.
- Click Next.
- Under Attribute Statements, create a field named
userNameand set the corresponding value for the username.
Example:- Field Name:
userName - Value:
${user.login}
- Field Name:
- Click Next and Finish.
Expected Outcome
- Users appear with their correct email-based username instead of numeric IDs.
- Naming conventions remain consistent across all accounts.

Edge Cases and Troubleshooting
Edge Case 1: User Already Exists with a Different Username
Issue: If a user was manually created in LinearB before SCIM provisioning, their username may differ.
Solution:
- Manually update the username in LinearB to match the expected SCIM format.
- Alternatively, remove and reassign the user through Okta.
Edge Case 2: Missing Attributes in SCIM Response
Issue: User attributes do not appear correctly in LinearB.
Solution:
- Ensure that all custom attributes (
userRole,scopeTeamIds, andviewDevCoaching) are mapped correctly in Okta. - Verify that the SCIM provisioning actions are enabled in Okta.
- Run the Test Connector to check for missing fields.
Edge Case 3: User Not Being Assigned to the Correct Team
Issue: A provisioned user does not receive the expected team assignments.
Solution:
- Verify that the Team Scope attribute (
scopeTeamIds) is configured correctly. - Ensure that the user has been assigned to a team in Okta Assignments.
- Check LinearB’s API or UI for manually assigned teams and adjust accordingly.
Edge Case 4: Developer Coaching Not Visible
Issue: A provisioned user has the correct role and team scope, but cannot see the Developer Coaching module.
Solution:
- Verify that the
viewDevCoachingattribute is configured and mapped correctly in Okta. - Confirm that the value sent for
viewDevCoachingis correct for that user. - Reassign the user or trigger a resync if the change does not appear immediately in LinearB.
Edge Case 5: SCIM Connector Fails During Setup
Issue: SCIM provisioning fails when testing the connector.
Solution:
- Confirm that the SCIM Base URL and API Token are entered correctly.
- Ensure that the authentication mode is set to HTTP Header.
- Check Okta logs for specific error messages and troubleshoot accordingly.

Summary
By following this guide, SCIM in Okta is configured correctly for LinearB, ensuring proper user provisioning, role assignments, team scoping, and Developer Coaching visibility.
For additional support, contact LinearB Support.
How did we do?
Authentication, SSO, & SCIM - Start Here
Managing Users in LinearB